Leave A Message
If you are interested in our products and want to know more details,please leave a message here,we will reply you as soon as we can.

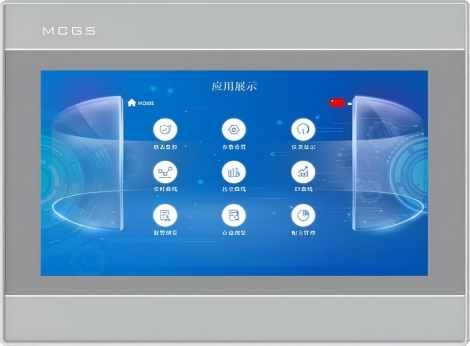
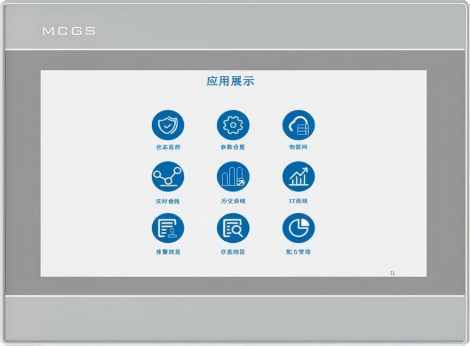
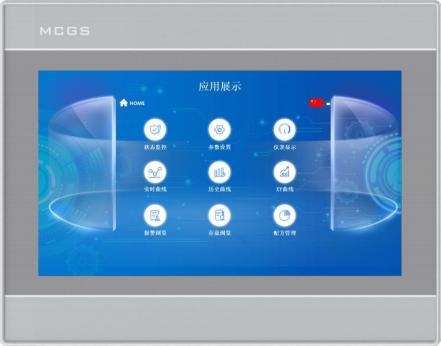
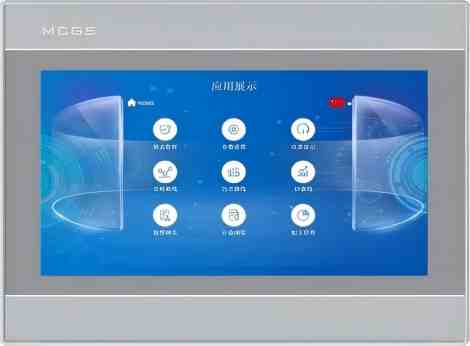
The K-series TPC is a premium intelligent HMI touchscreen released by Kunlun Tech, capable of fulfilling diverse application requirements from end users.
Item No :
TPC1051KsOrder(MOQ) :
50Payment :
Paypal\TT\Western UnionProduct Origin :
Guangdong, ChinaWeight :
1KGThe K Series prioritizes ease of use and comes with fully functional comprehensive interfaces. All standard models adopt an 800*480 resolution, while the 10-inch version is configured with 1024600. It provides 128MB and 256MB RAM alternatives, alongside 512MB and 8GB storage options. Meanwhile, it is fitted with abundant peripheral interfaces.
Product Specifications
| Classification | Item | TPC1051Ks |
| Product Features | Liquid crystal screen | 10.1" TFT |
| Backlight type | LED | |
| Display color | 262K | |
| Resolution | 1024×600 | |
| Display brightness | 300cd/m² | |
| Touch screen | Four-wire resistive | |
| Input voltage | 24±20% VDC | |
| Power isolation | built-in | |
| Rated power | 9W | |
| Processor | Cortex-A53 Quad-core 1GHz | |
| RAM | 512MB | |
| System storage | 512MB | |
| Storage space | 512MB | |
| Hardware clock | built-in | |
| Configuration software | McgsPro 3.3.6.6354 SP1.3 Versions 1 and 2 | |
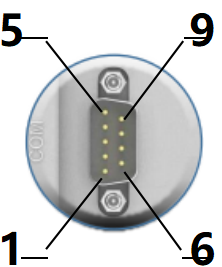
| External Interface | Serial interface | Way 1: COM1(232), COM2(485), COM3(485), COM4(232)
|
| Serial port isolation | built-in | |
| USB interface | 1×Host | |
| Ethernet port | 1 × 10/100M Adaptive | |
| Environmental conditions | Operating temperature | 0℃~45℃ |
| Operating humidity | 5%~90% (non-condensing) | |
| Storage temperature | -10℃~60℃ | |
| Storage humidity | 5%~90% (non-condensing) | |
| Product Specifications | Casing material | Engineering plastics |
| Casing color | Silver | |
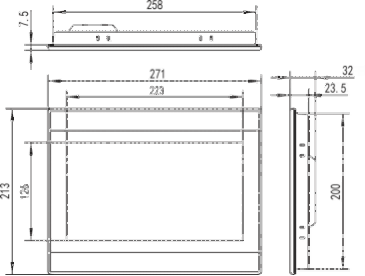
| External dimensions | 271mm×213mm | |
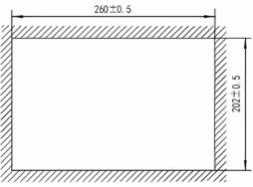
| Rack opening | 260mm×202mm | |
| Certification | Product Certification | conform to CE/FCC Certification Standards |
| Protection level | IP65 (Front Panel) | |
| Electromagnetic compatibility | Industrial Level 3 |
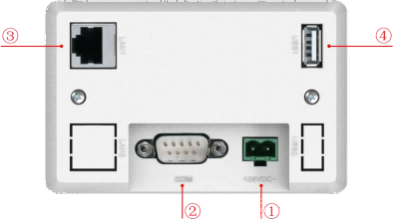
Interface Description
|
① |
Electricity source |
|
|
- |
1 |
0V |
|
+ |
2 |
DC24V |
||||
|
② |
Serial port |
|
COM1 |
2 |
RS232 RXD |
|
|
3 |
RS232 TXD |
|||||
|
5 |
GND |
|||||
|
COM2 |
7 |
RS485+ |
||||
|
8 |
RS485- |
|||||
|
COM3 |
4 |
RS485+ |
||||
|
9 |
RS485- |
|||||
|
|
1 |
RS232 RXD |
||||
|
COM4 |
6 |
RS232 TXD |
||||
|
|
5 |
GND |
||||
|
COM9 |
7 |
RXD+ |
||||
|
8 |
RXD- |
|||||
|
4 |
TXD+ |
|||||
|
9 |
TXD- |
|||||
|
Note:COM9 and COM2, COM3 They cannot be used simultaneously. |
||||||
|
④ |
Network port |
10M/100M adaptive Ethernet port, capable of uploading or downloading projects and upgrading the operating environment (the screen's operating environment requires Pro 3.3.2). (and above ), and can also communicate with other devices. |
||||
|
⑤ |
USB main port |
USB 2.0, supports via U The disk updates the touchscreen operating environment, projects, system, and provides functions such as data import and export. |
||||
Product Installation
l Product Dimensions
External dimensions
Opening size
l Installation method
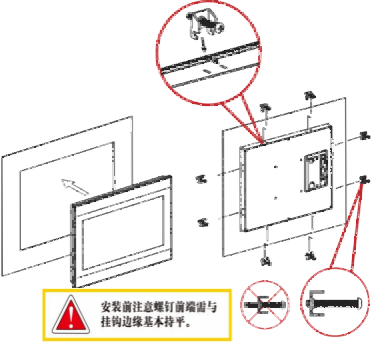
Hook installation
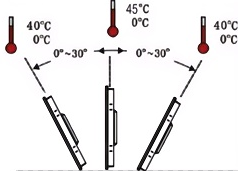
Installation angle
product introduction
1.5.1 Replacement battery
Battery location: TPC On the circuit board inside the product
Battery specifications: CR1220 3V lithium batteries
To remove the battery: Remove the adhesive on top of the battery, gently move the positive terminal to the battery position, and the battery will pop out automatically.
Install the battery: First, place the battery into the positive terminal clip, and then gently press the other end under the plastic clip. Check that both plastic clips and the metal positive terminal clip are properly inserted.
When installing, please be careful to avoid short-circuiting the positive and negative terminals of the battery.
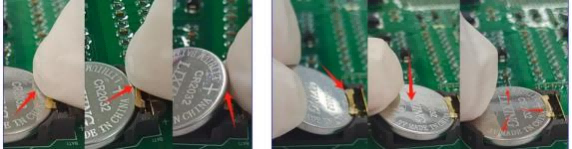
Remove battery Install battery
1.5.2 Touch calibration
Enter TPC In the system settings interface, press and hold on a blank area. 3 The touch calibration process will begin in seconds.
TPC Calibration: Use a stylus or finger to lightly press and hold the center point of the crosshair cursor. When the cursor moves to the next point, lift it. Repeat this action until the message "New calibration settings have been measured" appears. Click the "Confirm Calibration" button to save and exit the calibration program.
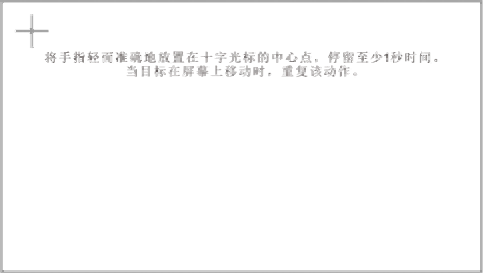
Place your finger lightly and accurately on the center of the crosshair cursor and hold it for at least one second as the target moves across the screen. Repeat this action.
1.5.3 Three-proof film
Give TPC Applying a protective film can effectively prevent dust , oil, and other contaminants generated during production from affecting the skin. TPC is susceptible to corrosion, therefore, if necessary, a protective membrane can be used to protect TPC. To protect it. This article takes... 1271Gn We will use this as an example for explanation; other models will be discussed later. TPC The steps for applying the screen protector are similar .
l Tools needed: TPC Includes a three-proof film (available for purchase from screen suppliers), dustproof cloth, anti-static environmentally friendly cleaning agent, and roller.
l Operating steps:
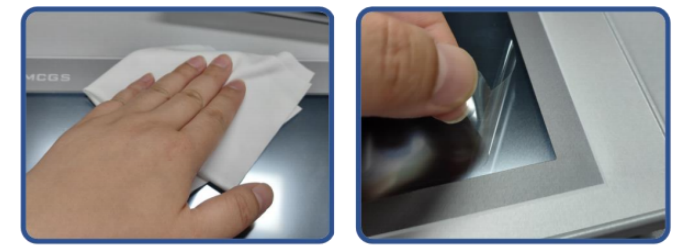
1) Clean the screen. Use a dust cloth to wipe away dirt from the front panel to prevent bubbles when applying the screen protector. If the TPC surface is heavily contaminated, use a cleaning agent to help clean contaminants in the crevices around the edges.
2) Remove the factory-installed PET protective film and clean any residue to prevent bubbles from forming during application.
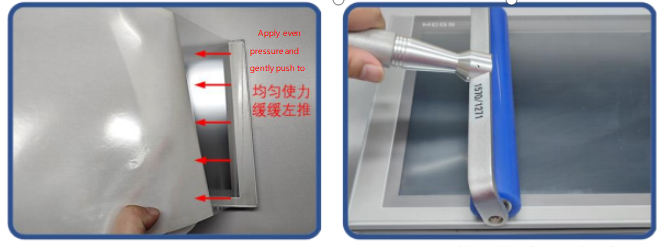
3) Peel off a corner of the backing film on the right side. Align the right side of the film with the right side of the TPC. With your left hand, slowly peel off the backing film, and with your right hand, apply even pressure to gently push the film onto the screen from right to left
4) After applying the film, use a roller to press the adhesive backing firmly to prevent air bubbles.
l Precautions:
1) The factory-installed protective film must be removed before applying the three-proof film. PET Protective film
2) The three-proof film is a consumable. If the edges are found to be peeling or bulging , a new film needs to be applied.
3) When replacing the protective film, pry it up from the lower right corner of the front panel, being careful not to scratch the sealing film.
2 Project Download
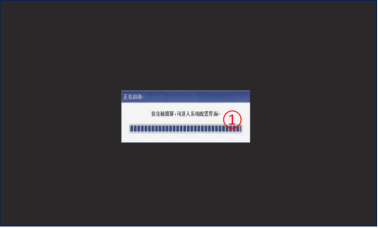
Step 1: Use 24V DC power supply TPC After powering on and starting up, a "Starting up" progress bar will appear on the screen. At this point, click... TPC①, You will be taken to the startup configuration interface. If no action is taken, you will be taken to the project running interface automatically .
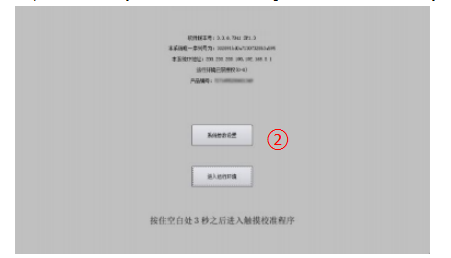
Step 2: Click the System Parameter Settings button ②. Enter TPC System settings interface.
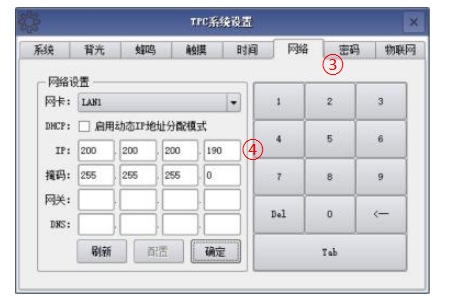
Step 3: Select the Network Settings tab ③, and configure... TPC IP Address 4, TPC default I P Address is 200.200.200.190 .
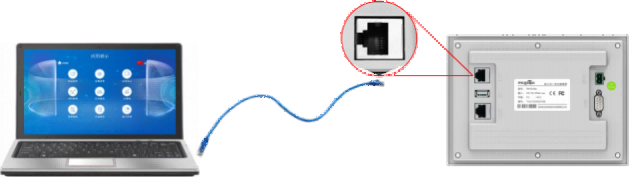
Step 4: Connect the computer and... TPC, and the computer IP With the connected TPC LAN port IP Set them to the same network segment.
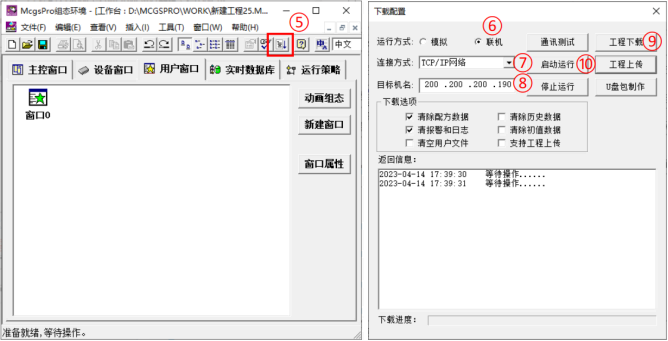
Step 5: Use MCGS Pro Open TPC Project, click to download project ⑤, Open the download configuration properties page and select "Online" as the run mode . Select the connection method "TCP/IP" "Network"⑦ Enter the target machine name TPC of IP Address ⑧ , Click "Download Project" (⑨). After the download is successful, click "Start & Run" (⑩) or... TPC The "Enter Runtime Environment" button on the interface runs the screen-side project.

Leave A Message
Scan to Wechat :

Scan to WhatsApp :